Pilcrow setup guide: your newsletter, your send day, your signup
NS. Studio · 2026-10-28
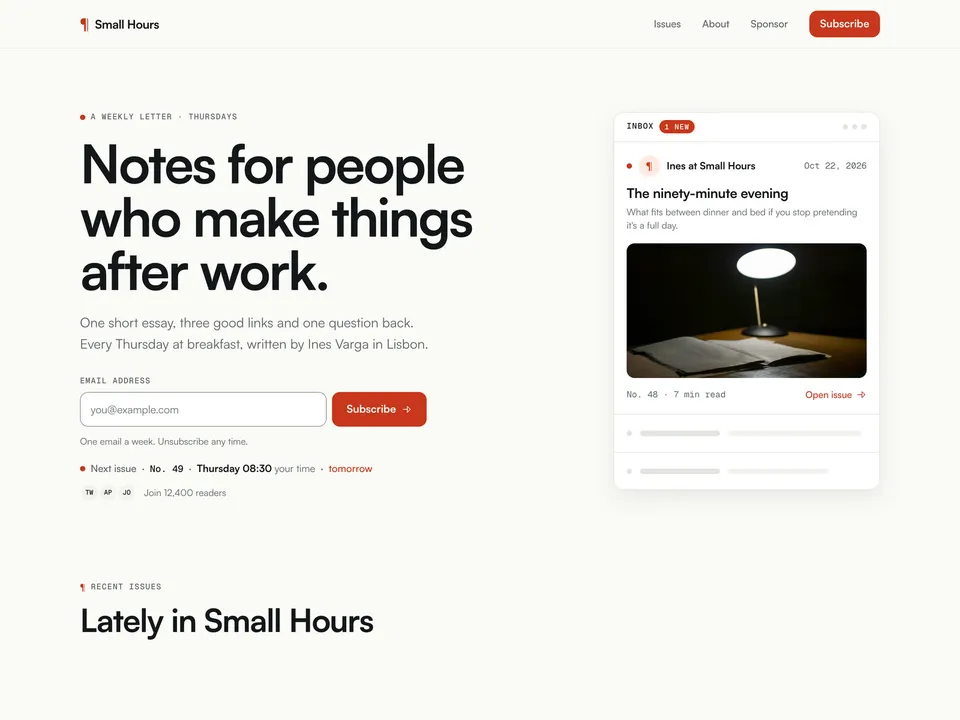
Pilcrow is a free Framer template for a one-person newsletter. This guide covers what to change after you remix it, in order: the name and fonts, the writer and the issues, the send schedule, the signup, and your domain. Keep the live demo open in another tab to compare.
1. Remix and rename
- Open the remix link from the Pilcrow page (or the Framer Marketplace listing) and click Remix. The whole project is copied into your Framer account.
- Rename the project: click its name at the top of the editor. The site name people see is separate: open Site Settings, General and replace the title, description and social image, which still describe the demo newsletter "Small Hours".
- The wordmark "Small Hours" in the navigation and footer is plain text inside the Navigation and Footer components. Edit it once in each component and every page follows.
2. Fonts
Pilcrow uses Satoshi for everything and Geist Mono for issue numbers, dates and labels. Both are built into Framer's font picker, so there is nothing to install. To change them, click an empty spot on the canvas, open the Styles panel on the right and edit the text styles: the display, heading and body styles carry Satoshi; the label, number and meta styles carry Geist Mono. The Next Send and Copy Link components have their own Font Family and Mono Family properties; set those to the same fonts.
3. The writer
The demo is written by a made-up writer, Ines Varga, and the reader numbers are sample text. These parts are plain text on the pages, not CMS items:
- Home: the kicker "A weekly letter · Thursdays", the headline, the lead ("written by Ines Varga in Lisbon"), the "Join 12,400 readers" line, the "What you get" columns, the "Hi, I'm Ines" strip with the portrait, and the sponsor strip.
- About: the intro, the portrait, "Why I write this", the facts table (since, cadence, readers, based in) and the email address.
- Sponsor: the audience numbers, the "What readers do" bars, the three placements and their prices, and the rules. Delete the "Sample numbers" tags and the "All prices are sample text" line once your own numbers are in.
- Issues: the count line under the heading says "48 issues · 8 shown in this template". Change it to your own count, and the "All 48 issues" link on Home with it.
- Welcome and Privacy: the sender address
hello@smallhours.exampleand the privacy text, which is template text and not legal advice.
Replace the two portraits (Home strip and About) with your own photo. The demo photos are from Unsplash.
4. Your issues in the CMS
Open the CMS from the left panel. Pilcrow has two collections:
- Issues (8 sample items): Title, Number (text, so "48" or "Vol. 3" both work), Date, Read time, Topic, Excerpt, Cover with alt text, and the Body as rich text. The newest issue by Date is the inbox card in the Home hero and on the Welcome page; the next three are the "Lately in" cards; the Issues page lists them all; each issue page shows three more at the end.
- Testimonials (6 sample items): Quote, Name, Role and a "Reader since" line. Home shows three, About shows all six. Replace the invented readers with real quotes, or delete the section until you have some.
Paste each issue's text into the Body field; headings, links and lists keep their formatting. Delete the sample issues you don't replace. The internal links inside the sample bodies point at other sample issues, so they go with them.
5. The send schedule (Next Send)
Next Send is the line "Next issue · No. 49 · Thursday 07:30 your time · tomorrow". It sits in four places: the Home hero, the signup card on every issue page, the footer, and as a card on the Welcome page. Each one is an instance of the same code component; select it and set the properties in the right panel. Use the same values on all four.
- Send Days: the days you send, for example
ThuorTue, Fri. - Send Time: 24-hour time in your own zone, for example
07:30. - Sender Zone: your time zone in IANA form, for example
Europe/BerlinorAmerica/New_York. Readers see the time converted to their own zone, with "your time" after it. - Cadence: Weekly or Every 2 weeks.
- Latest Number and Latest Date: the number and date of the issue that went out last. The next number counts up from it; type
noneto hide numbers. Every 2 weeks uses the date to pick the right weeks. - Paused Until and Pause Note: fill in a date when you take a break and the line reads "Back on Thursday 7 January · Taking December off". Clear it when you are back.
- Clock (24h or 12h), the labels, colours and fonts.
Next Send only knows what you type here. It does not read your sending tool, so when you skip a week or change the day, update the properties. Until a visitor's browser loads, the component shows a plain "Every Thursday at 07:30 (Lisbon time)" sentence, which search engines and the canvas see.
6. The signup form
Every signup on the site (Home hero, issue pages, footer) is an instance of one component, Signup Form (Assets, Components). Change it once and every page updates. Out of the box it is Framer's native form:
- Select the Native Form layer inside the component and open its form settings in the right panel. Choose where submissions go: Framer keeps them in the project's form inbox and can email you or pass them to a connected tool. How many submissions you can receive depends on your Framer plan.
- The form already redirects to
/welcomeafter a successful signup, where Next Send tells the reader when their first issue arrives. - A hidden field called source arrives with every signup and says which form was used:
home-hero,issueorfooter. - The small print ("One email a week. Unsubscribe any time.") is the component's Small Print property.
The native form collects addresses; it does not add anyone to a newsletter service by itself. If you send with a service, connect it as in the next section.
Connect beehiiv
Prefer to watch? The video below does every step on a copy of Pilcrow, from the beehiiv form settings to a test signup on the live site.
beehiiv is a newsletter platform with a free plan: a subscriber list, sending, subscribe forms, a referral program and paid subscriptions. Pilcrow has two ways to connect it. Pick one.
Some links on this page are affiliate links. If you sign up, NS. Studio may earn a commission at no extra cost to you.
Option A: put the beehiiv form in the Signup Form component
The Signup Form component has a hidden layer, Embed Slot, that sits exactly where the native form is. Swapping takes three steps:
- In beehiiv, open Audience, Subscribe forms and click Create new form. The default form is 339 px tall with a title and subtitle, so make it a one-line form: under Content turn Title and Subtitle off; under Style, Background set Transparent background on, Padding 0, and under Form set Width 520 px and Corner radius 12. Under Settings choose Redirect to an external website and enter
https://your-domain/welcome. Save, then click Get embed code and copy the script tag (the one withloader.jsand your form id). Subscribe forms are included in beehiiv's free plan. - In Framer, open the Signup Form component (Assets, Components, double-click it), select the primary variant Hero, select the Native Form layer and set Visible to off. Select Embed Slot and set Visible to on. The other four variants (Hero Stacked, Compact, Dark, Dark Stacked) follow the primary.
- With Embed Slot selected, choose Insert, Embed, set the Embed to width Fill and height Fill, and paste the beehiiv embed URL or HTML. Preview a page to check it.
Embed Slot is 520 × 60 in the inline variants (Hero, Dark) and 140 px tall in the stacked ones, so the one-line beehiiv form above fits without changes; the form shows in the editor and on the published site. If you keep beehiiv's title and subtitle, raise the slot height to the form's height (339 px by default) on each variant. One beehiiv form has one style, so it looks the same in the light hero and the dark footer; make a second form with a dark style and use it in the Dark variants if you want them to match. The redirect to /welcome keeps the Next Send card in the flow; the Welcome page copy doesn't assume the native form.
Welcome email: in beehiiv open Settings, Emails, Preset emails and turn on Welcome email; that one is part of the free plan. beehiiv's Automations (multi-step journeys) need a paid plan.
Option B: send the Subscribe buttons to your beehiiv subscribe page
If you'd rather keep the site simple, leave the native form hidden or delete it and link straight to beehiiv:
- In beehiiv, copy your publication's subscribe link (the public page where people sign up).
- In Framer, open the Navigation component, select the Subscribe button and paste the link into its Link property; repeat in each variant of the component (the phone variants have a second Subscribe inside the open menu sheet). The buttons currently point at
/#subscribe, the hero form. - Replace or remove the Signup Form instances in the hero, on the issue pages and in the footer, for example with a Button that links to the same subscribe page.
With Option B the Welcome page is never shown, since the reader signs up on beehiiv's page. You can keep it for your own confirmation flow or remove it from the site.
Publish and connect your domain
Click Publish to go live on a free framer.website address. To use your own domain, upgrade the project to a Framer site plan, open Site Settings, Domains, add the domain and copy the DNS records Framer shows into your domain registrar. Custom code in Site Settings doesn't publish on the free plan.
Want more?
Broadsheet is our paid newsletter template ($59): a signup component that sends addresses straight to Kit, Mailchimp, Buttondown or a webhook, and a sponsor calendar where sponsors pick open dates. If you'd rather not set Pilcrow up yourself, template setup starts at $79.