Tearsheet setup guide: projects, in-place cases and the enquiry form
NS. Studio · 2026-10-28
Tearsheet is a free one-page portfolio for independent designers and small studios. Your name runs across the top in huge type, and every project opens in place, with its own link. This guide covers what to change after you remix it. Keep the live demo open in another tab to compare.
1. Hero
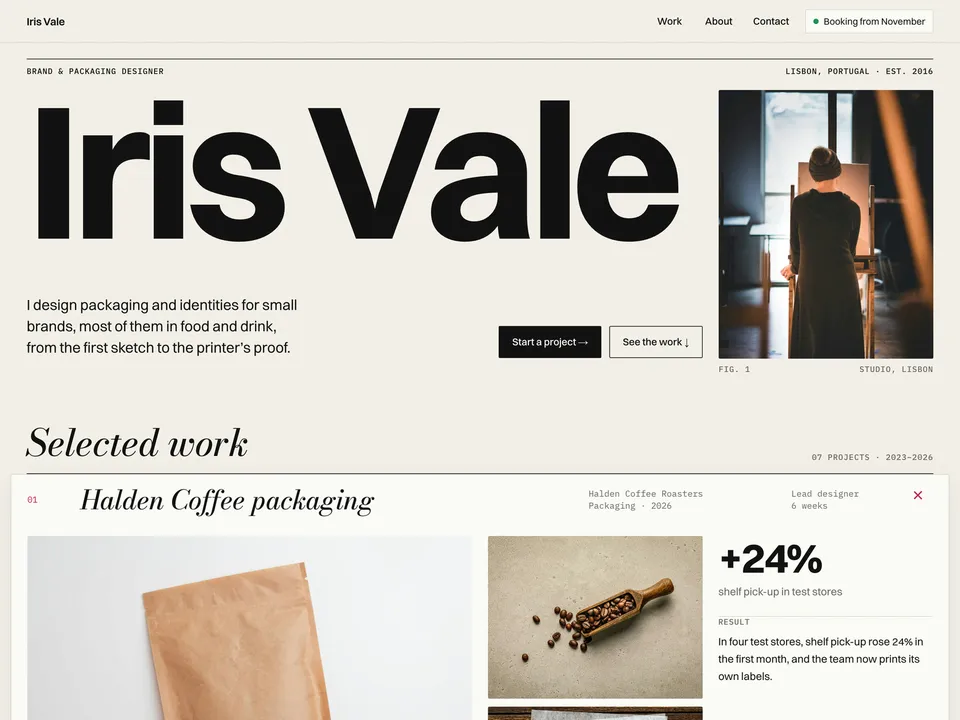
- Change the name, the discipline line, the city and the short description. The name sizes itself to fit the width, so long names fit without manual resizing.
- Update the availability label ("Booking from November") whenever it changes.
- Replace the studio photo next to the hero.
2. Projects in the CMS
Open the CMS from the left panel. The collection has 7 example projects; each is a row in "Selected work" that opens in place, and its own case page.
- Fill in title, client, discipline, year, role and timeline, then Brief, What I Did and Result. The in-place view shows plain text; formatted text goes in Body, which appears on the full case page.
- Add the cover and two more images, plus a Share Image for link previews.
- Metric Value and Metric Label are the one big number on each project ("+24%", "shelf pick-up in test stores"). Use a number you can stand behind.
- Turn on Open First for the project you want open when the page loads, and set Order to sort the rows.
- Set Live Link to the real site, or leave it empty to hide the "View live" button.
- Every project has its own link,
/#work-your-slug, that opens it straight away. Use it when you send one project to a client. - Delete the example items you don't replace. Check Framer's current plan limits at framer.com/pricing before you add many more.
3. About, services, experience and testimonials
Edit the text directly on the canvas: the about paragraphs, the three "What I do" items, the experience rows and the two quotes. Replace the quotes with real ones, or delete the section until you have them.
4. Contact
- Change the email address. It copies on click, so check the copied text after you edit it.
- The enquiry form (name, email, project type, timeline, brief) uses Framer's form submissions: select the form and set where submissions go in the right panel. Edit the project type and timeline options to match your work, then send yourself a test from the published site.
- Update the Instagram and LinkedIn links in the contact block and the footer.
Publish and connect your domain
Click Publish to go live on a free framer.website address. To use your own domain, upgrade the project to a Framer site plan, open Site Settings, Domains, add the domain and copy the DNS records Framer shows into your domain registrar. It usually works within an hour.
Before you publish, open Site Settings, General and replace the title, description and social image with your own, so search results and link previews show your name and not the demo's.
Tools that help
- Cal.com if you would rather talk than read a form: a free scheduling link synced with your calendar. Link the "Start a project" button to it. New users get 20% off for 12 months through our link.
- Mobbin for case-study research: a library of real app and web screens to benchmark against when you explain your design decisions.
Some links on this page are affiliate links. If you sign up, NS. Studio may earn a commission at no extra cost to you.
Want more?
Margin Notes ($49) is our paid portfolio for working freelancers, with services, a live availability line and a budget field on the contact form. If you'd rather not set Tearsheet up yourself, template setup starts at $79.