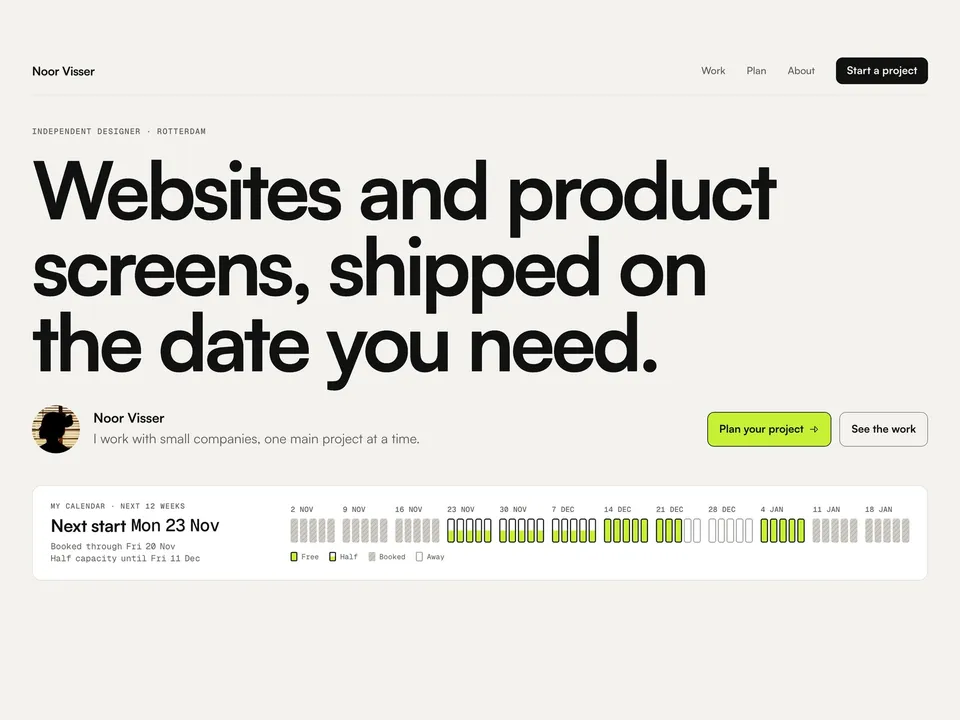
Workback setup guide: your bookings, your packages, your contact form
NS. Studio · 2026-11-02
Workback is a free Framer portfolio for independent web and product designers who work with clients. Its planner lets a client check their deadline against your bookings before they write, and the plan travels into your contact form. This guide covers what to change after you remix it, in order: your name and text, your bookings, your packages, your case studies, the contact form, and publishing. Keep the live demo open in another tab to compare.
What Workback does and doesn't do: the planner and the calendar strip read the bookings you type into them. They don't sync with Google Calendar, Cal.com or any other calendar, and they don't hold a slot for anyone, so update the text when your calendar changes. The planner is a guide, not a quote: it shows no prices, and every enquiry can still be sent.
1. Remix and rename
- Open the remix link from the Workback page (or the Framer Marketplace listing) and click Remix. The whole project is copied into your Framer account.
- Open Site Settings, General and replace the site title, description and social image, which still describe the demo designer "Noor Visser". Each page also has its own title and description in the page's settings; the case study pages take theirs from the CMS (the case title followed by the name).
- The wordmark, the links and the phone menu live in the Navigation component, and the name, the "Independent designer · Rotterdam · CET/CEST" line, the links and the legal line ("A made-up designer for a Framer template; photos from Unsplash") live in the Footer component. Edit them once in each component and every page follows.
- Replace the demo address
noor@visser.example. It is in the footer, beside the form on Contact and in the error state of the form's submit button. In the footer it is amailto:link, so change the link as well as the text. - The LinkedIn and Read.cv links in the footer point to the sites' home pages: set them to your profiles or delete them.
- The rest is plain text on the pages: the hero, What I do, How I work and the two quotes on Home, the bio, Working together, Tools and Clients on About, and the What happens next steps on Contact. Noor Visser, her clients, case studies, numbers and quotes are all made up, and the photos are from Unsplash. Replace the quotes with real ones, or delete the section until you have some.
2. Fonts
Workback uses Satoshi for all text and Geist Mono for labels, dates and metrics. Both are in Framer's font picker, so there is nothing to install. To change them, open the Styles panel and edit the text styles. The Workback Planner, Queue and Summary components have their own Font Family and Mono Family properties; set them to the same fonts.
3. Your bookings
Your calendar appears three times: the Workback Queue strip in the hero on Home, the Workback Planner in the Plan section on Home, and the Availability line beside the form on Contact (a second Workback Queue, set to the Line mode). Each one has its own properties, so set the same values on all three:
- Queue: one booking per line, written as
from to to: booked,halforaway. For example2027-01-11 to 2027-01-22: booked,2027-02-01 to 2027-02-12: halfand2026-12-24 to 2027-01-01: away. A single day works too:2027-04-27: away. Use booked for main projects, half for retainers or part-time work (the planner counts half a day), and away for holidays and days off. Public holidays are only known if you add them as away days. When two lines overlap, away wins over booked, and booked over half. A line it can't read is skipped, and on the canvas the planner shows a small note with its line number. - The demo uses relative dates such as
+0w to +2w: booked(+Nwis the week N weeks from this week,+Ndis N days from today), so the demo never looks out of date. Replace them with your real dates inYYYY-MM-DD. - Time Zone: your time zone as an IANA name such as
Europe/AmsterdamorAmerica/New_York. "Today" is taken in your zone, so every visitor sees the same plan. - Work Days: a list such as
Mon, Tue, Wed, Thu, Frior a range such asMon–Thu. - Lead Days: the working days you need between a yes and the kickoff, for a contract, a deposit or prep. The earliest start shown on the strip and in the planner both use it, so the two always agree.
- Locale: how dates are written, for example
en-GB(Mon 23 Nov) oren-US(Mon, Nov 23).
4. Your packages and the planner
Select the planner in the Plan section on Home. Besides the booking properties above, it has:
- Packages: one per line,
Name | design days | review rounds | build days. Build days0means design only, and the Build option is hidden for that package. - Review Speeds and Content Options: the choices the client picks from, each as
Label | days, separated by commas. Review speed is the client's working days per review round; content is the client's working days before design can start. Commas inside a label are not supported. - Build Label, Hand Over Text and Hand Over Noun: the wording of the build option and of the "What it takes" suggestion when it proposes handing over the Framer file instead of building.
- Fit Buffer: the spare working days a plan needs to show as Fits. With less, it shows Tight; after the date, Late.
- Contact Link, Button and Footnote: where "Send me this plan" goes (
/contact) and its labels. - Preview: shows the sample plan on the live site too. It is off, so visitors start from an empty planner.
The What I do section on Home reads the Packages collection in the CMS (Name, Design days, Rounds, Build days, Length, Includes and Order), not the planner. The two are separate, so when you rename a package or change its days, change it in both places. Length is the line shown under each package, such as "8 design days · 2 review rounds · + 4 build days".
5. Your case studies in the CMS
Open the CMS from the left panel. The Cases collection has 6 sample case studies. Each has its own page at /work/your-case-slug and a card in Selected work on Home.
- The facts: Title, Client, Year, Type, Role, Scope, Timeline, Built in and a one-sentence Summary (also used as the page description).
- The story: Brief, three outcome metrics (Metric 1 to Metric 3, each with a Label; Metric 1 also shows on the card) and the Body with your process under its own headings. Use numbers you can stand behind.
- Planned and Shipped: the date you promised and the date it went live. Clients read this row closely, so keep it honest; one demo case ships a week late and says why.
- The images: Cover, Image 2 and Image 3. Write alt text for each image in the CMS, so screen readers and search engines know what it shows.
- Next Case: the slug of the case linked at the bottom of the page. The demo runs in a loop, each case pointing to the next and the last back to the first. When you add, remove or rename a case, update the Next Case fields so the loop stays closed.
- Order: the position of the card on Home.
6. Decide where messages go
The Contact page uses Framer's built-in form, with Name, Email, Company, Website and Message. Select the form and choose where submissions go in the right panel: Framer keeps them in the project's form inbox and can email you or pass them to a connected tool or a webhook. How many submissions you can receive depends on your Framer plan. Publish and send yourself a test message before you share the site.
When a client comes from the planner, the plan is in the page address and the Workback Summary card shows it at the top of the form. The card adds eight hidden fields to the submission: Project, Deadline, Reviews, Content, Build, Kickoff, Live and Verdict (for example "Fits, 36 working days to spare"). The values arrive as the client saw them; nothing is recalculated. Without a plan, the fields are empty and the card invites the visitor to plan first. Its Plan Link (the "Change the plan" link) goes back to /#plan.
7. Publish and connect your domain
Click Publish to go live on a free framer.website address (the free plan shows the Framer badge). To use your own domain, upgrade the project to a Framer site plan, open Site Settings, Domains, add the domain and copy the DNS records Framer shows into your domain registrar. Framer's help article How to connect a custom domain covers each registrar. Workback has two CMS collections, so it fits the Basic plan.
8. Optional tools
Workback works as it is. These three tools fit a designer who works with clients:
- Cal.com for the kickoff call. The last step on Contact says that if the date works, you book a 30-minute call. Make a 30-minute event type in Cal.com (it has a free plan) and send the link in your reply. Workback doesn't read Cal.com bookings, so keep the planner's Queue up to date by hand.
- Granola for client call notes. It takes notes on your computer during the call, without a bot joining the meeting, and turns them into a summary you can keep for each project.
- Mobbin for case-study research. A library of real app and web screens to benchmark against when you explain your design decisions in a case study.
Some links on this page are affiliate links. If you sign up, NS. Studio may earn a commission at no extra cost to you.
Try Cal.com Try Granola Try Mobbin
Need a hand?
If you'd rather not set Workback up yourself, template setup starts at $79: your bookings, packages, case studies and contact form filled in, and your domain connected.